|
Generator
A week after replacing the voltage regulator, the generator light came
on again. This time I decided to get the generator rebuilt.
Here, from the factory manual, is more than you ever wanted to know
about generators:
To remove the generator, you will have to get clearance for the fan to
come out of the shroud. You don't have to remove the engine to
replace the generator. Good.
The description below applies to my '66 912. Minor differences will
exist for newer engines.
Removing the Generator
| I started by removing the air cleaners because you need some access
behind the fan shroud. It is best to cover the carburetor throats with
a plastic bag secured with a rubber band so you won't drop anything
down the throats. Unless the idea of turning the car upside down so
you can shake it back out is appealing.
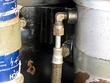
Remove the oil filler can from the generator stand.
|
| Remove the top end of the oil line going into the side of the oil
filter housing.
Remove the strap that ties the housing to the shroud. You should be
able to push the filter housing out of the way to complete the
generator exchange.
Remove the right-most bolt holing the bracket for the oil filter
housing. This bolt goes clear through the shroud so you'll have to
work with one hand and a wrench over the top or around the side of the
shroud. Now you'll appreciate having removed the air cleaners to gain
better access t the back of the shroud.
When you pull out the bolt, parts may fall off the back, landing where
you hope you can find them again.
Loosen the other bolt on the bracket so it can be rotated out of the
way.
|
| Remove the pulley from the generator. Notice all the washers. These
must all be saved as they are used to adjust the tension on the fan
belt. To make the fan belt tighter, a washer is moved from between
the pulley halves to the outside under the nut. The original tool kit
has a wrench that fits the generator nut.
Remove the three wires from the generator.
Remove the strap that holds the generator to the generator stand.
You should be able to remove the four bolts that secure the fan
assembly to the shroud. These are short.
|
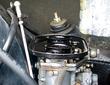
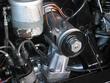
| The picture shows the generator stand already removed. It comes off
the engine easily by removing the front two bolts and loosening the
rear ones. It pulls back toward the rear and free after the strap
holding the generator is removed.
The strap around the distributor is from the oil filter.
|
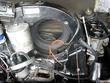
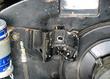
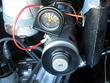
| Here is the engine after the generator and fan was removed.
Let's see. What more would I have to remove to change to a
911 fan and alternator?
|
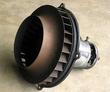
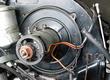
| Here is the generator and fan. I took this assembly as shown to
AutoLectrics in Campbell, CA, (408) 559-3540, just a couple of
miles from the house. Gabe at Strasse
told me about this place. He knew about it because they did all the
generator work for Automotion and evidently still does work for
Performance Products.
I set the assembly on his counter and said, "Can you fix it?". He
said, "Yes, of course. 6 or 12 volts?". "12", I said, "It's off a
...". "...Porsche.", he said, completing my sentence. I'm at the right
place.
|
Reassembly
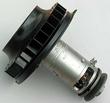
| What a difference a day makes. The generator was rebuilt in less than
a day for $123. The shop owner says he is getting Porsche business
from outside the state and recently did some work for one of Jerry
Seinfeld cars.
|
| The oil filter housing bracket mounts to the shroud with bolts that
attach to large washers and nuts on the back side. This is very
awkwardly placed and I was lucky not to have dropped the washers or
nuts behind the engine again.
The trick I used was to use sticky wheel bearing grease to capture the
nut in the end of a wrench so I could fumble around with it and have
some hope of not dropping it behind the engine again. The grease
worked.
|
| In the back-ground is the oil filter housing bracket mentioned below.
The order of assembly is important and went something like this:
- Mount the fan housing on the shroud. Start all 4 bolts but do not
tighten.
- Add the generator stand under the generator. Tighten the bolts.
- Tighten the fan housing bolts.
- Place threaded end of the the oil filter housing strap under the
bracket and add both bolts, large diameter washers and nuts through
the shroud.
- Remount the oil filter housing with its strap and bolt. The bolt
is behind the oil input line, so it should be tightened before the
input line is connected to allow easy access.
- Connect and tighten the oil line.
- Install the strap connecting the generator to the stand.
- Connect the oil filler to the stand.
- Connect the electrical wires to the generator. I used an older
picture to remind me which wire goes to which connection.
- Connect the fan belt.
|
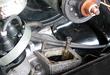
| This shot is approximately at step 6 above, although the wires are
already connected to the generator.
|
|
Testing the generator is simple if you have an
ammeter. My generator is is rated at 14volts, 25 amps. The ammeter
is attached in series with the D+ wire on the generator. You do not
want to draw more than 25 ampere from the generator. An electrical
short or a bad voltage regulator could allow too much current to be
drawn. If this happens the generator could overheat. After about 15
minutes in this condition the solder in the armature contacts could
melt, ruining the generator.
My new and rebuilt components now act normally:
- The generator light turns off above about 1000 RPM.
- The generator amperage rises with increasing RPM to about 25 amps.
- At higher RPM the ammeter begins to jump, showing the regulator is
preventing more than 25 amps from flowing from the generator.
|
Last modified: Mon, 31 Dec 2001
Links
|


