|
Research on Rust
Rust is the killer in old cars. Repairs are expensive. The problem
starts off hidden. It is insidious and can be dangerous. There were
two rust problems on my 912 that were obvious when I bought the car,
The front body pan had rust damage between and around the front
suspension attach points (now fixed, see below) and the passenger door
sill had a visible damaged area. I am so paranoid about rust that I
almost never wash the car with a hose and try not to drive it in
the rain.
Cavity Waxes
The current issue (October(?), 2000) Classic Sports Cars magazine
has an article on cavity waxes. These materials do not seem to be
discussed much in the U.S, but are designed to be placed in hard to
reach areas such as fender wells and door bottoms to prevent rust from
forming. Any pre-existing rust should be first converted from ferrous
oxide with an acid wash. Their recommended product brand is
Dinitrol,
an English product that may not be available here. The magazine
considers the materials required for old daily driver cars.
A couple of links mentioning cavity wax:
- A Primer on rust.
- Article on the application
of Teroson cavity wax.
Front Body Pan
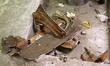 I knew that the
front body pan had rust damage when I
bought the car. I first planned to have it fixed the winter following
purchase, but judging by the ominous suspension noises and fresh
cracks around the damaged area I moved the time table forward. If
left alone, this particular problem can be dangerous because the body
pan provides the attach points to the front of the torsion bars.
Imagine turning a sharp corner and having the torsion bar go straight! I knew that the
front body pan had rust damage when I
bought the car. I first planned to have it fixed the winter following
purchase, but judging by the ominous suspension noises and fresh
cracks around the damaged area I moved the time table forward. If
left alone, this particular problem can be dangerous because the body
pan provides the attach points to the front of the torsion bars.
Imagine turning a sharp corner and having the torsion bar go straight!
This problem was professionally repaired in early September, 2000.
Here is the story.
Passenger Door Sill
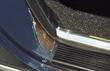 Passenger side rust
damage in the door sill. This extends to the rocker panel. It was
caused by an accumulation of dirt and gravel in the front of the rear
wheel well, trapping moisture next to the metal whenever the roads get
wet. Check your car by shining a flashlight into the wheel well.
Wash out any dirt found. I cleaned and used naval jelly in the rusted
area. The purpose is to slow down the rust until it can be properly
repaired. Otherwise it could spread very quickly - and it may in spite
of this effort because it is impossible to get to all affected
surfaces. Then I sprayed the area with Rust-Oleum 'Rusty Metal Primer'
and 3M Undercoat. Passenger side rust
damage in the door sill. This extends to the rocker panel. It was
caused by an accumulation of dirt and gravel in the front of the rear
wheel well, trapping moisture next to the metal whenever the roads get
wet. Check your car by shining a flashlight into the wheel well.
Wash out any dirt found. I cleaned and used naval jelly in the rusted
area. The purpose is to slow down the rust until it can be properly
repaired. Otherwise it could spread very quickly - and it may in spite
of this effort because it is impossible to get to all affected
surfaces. Then I sprayed the area with Rust-Oleum 'Rusty Metal Primer'
and 3M Undercoat.
Steps to stop continuing damage to rusted areas:
- Remove old rust by wire brush, rotary grinding or brush.
- Change remaining iron oxide into iron phosphate using Naval Jelly.
- Neutralize the phosphoric acid with baking soda paste.
- Clean up with water. Dry with clean rags and heat gun. The bare metal will oxidize quickly so next step must be done promptly.
- Paint with Rust-Oleum Rusty Metal Primer.
- After primer has dried, spray with 3M Underseal Rubberized Undercoating Nr. 08883. Black.
My tank had enough rust in it to clog fuel filters. I called the
POR-15 people and asked who I should take my
gas tank to to get treated with their material. They recommended
Vintage Auto in Oroville (now moved to
Williams). I had it fixed at the same time as the front body pan
restoration. It cost about $80.
Here is
an article off the WEB on
using POR-15 for fixing gas tank leaks.
Subject: Fuel Tank repair - POR-15 report
From: ??michael <juriga@IDT.NET>
Date: Tue, 3 Nov 1998 14:31:43 -0500

Hey all,

Update on my rescued Interceptor. I just finished prepping the tank. I
DID NOT use crappy Kream. Read on.

The Interceptor I've rescued had sat outside with 1/3 a tank of gas
for about a year and a half. The internals were definitely rusty
though still tight w/o leaks. I needed to do something about the
internals but didn't want to use Kream (because it is not a permanent
fix and the problems it can cause when it decides to go are *NOT*
fun.) My work with restoring my 1970 Chevelle SS had brought me in
touch with a company called Restomotive who produce a product called
POR-15. This stuff is amazing. All the resto rags rave and car related
Internet sites are a-buzz about it. When used properly, it stops rust
*DEAD*.  It forms a super hard surface that is very hard to scratch or
chip. Even my Evil Twin Joey (the ToeCutter) Thorne, who works on
boats, knew about POR-15 and had favorable things to say about it. If
a rust repair product can work properly in a Marine/Saltwater
environment than it has GOT to be good. Awhile ago, I found a tank
prep product kit in their catalog. I have been very happy with other
products of theirs, so I have been waiting for an opportunity to try
this one. Hey, they even show a V65 Sabre's tank in the catalog. I
think that this is a sign.

The kit contains: Marine=Clean (a water based, alkaline
cleaner/degreaser, supposedly environmentally friendly but I wouldn't
let it sit on your skin for very long), Metal Ready (a mildly acidic
solution which completely turns rust into a neutral Zinc
Phosphate. Much nicer to work with than the highly acidic hydrochloric
solution in the Kream kit. Also, Metal Ready can be saved and
reused.), Tank Sealer (which reminds me of POR-15 Silver), a piece of
cloth and a disposable brush (to repair pin holes and leaking seams,
which I did not need to use, so I cannot vouch for.) A heavy duty
version of the kit also has a step that will completely remove a
previous tank lining like Kream.

Use of the kit is not as quick as using Kream. YOU MUST TAKE YOUR
TIME! If you follow the directions given to you by POR-15 and the
suggestions I've outlined here you should be okay.

Cleaning the tank

Seal all openings and vent tubes on the tank. Duct tape is suggested,
but it kept coming off of the two large openings on my tank due to
LOTs of water. I improvised by slipping the gas cap into a surgical
glove and installing it the way it would normally go to seal the top
hole. luckily had a large cork the size of the fuel gauge sending unit
hole to seal that as well. Using the Marine=Clean, mix one part
cleaner and one part boiling water. Pour into tank and then seal it
tight. I agitated the solution in the tank by gently rocking it back
and forth. Rock and roll. Rock and roll. Make sure the cleaner gets
everywhere. The cleaner needs to be in the tank for at least 24 hours,
more for heavily varnished or dirty interiors. I would agitate for
about 20 minutes, and then let it sit for an hour or two. Then I'd
agitate some more and let it sit again, but in a different position
than before. After 24+ hours I dumped the cleaner out and flushed
liberally with water. I used my bathtub as I don't have good access to
an open area w/ a hose. Your wives or SO may kill you for this as it's
messy, but not damaging. Flush it well. You want to remove as much
alkaline solution as possible for the next step, which is more acidic.

Rust destruction/ "etching"

When I say etching I don't mean like the extremely harsh Kream
method. Metal Ready is technically acidic, but pretty mild in
comparison to the Kream Kit's (Phosphoric or Hydrochloric Acid?) Metal
Ready's main job is to CONVERT rust to a neutral Zinc Phosphate. Any
etching properties are pretty minor. Metal Ready takes about 30
minutes to work for a tank in the condition of mine.  Heavy rust will
take longer. Again I'd agitate the tank/solution in a slow rocking
motion. Turning and rocking and rolling and turning. Watch a movie
that you know by heart when you do this. I watched Mad Max again. When
the tank is done, remember that you can reuse Metal Ready, so I
siphoned it out of the tank. Again, flush liberally with water. You
should see black flakes of particulate now instead of rust
colored. That is the zinc phosphate converted rust.

THE MOST IMPORTANT STEP

Okay, you're pretty excited now that the rust is gone. The job is
going well and you want to keep the momentum going. Before you go
pouring the sealant into the tank STOP! The tank **MUST** be
absolutely bone dry. POR-15 cures with water. If a single drop of
water (or sweat) drops into your pint can of POR-15 while you are
working THE WHOLE FREAKING CAN IS WASTED!  This tank sealant is the
same.

After the flushing out from the Metal Ready step I again siphoned out
as much of the water still trapped in the tank as I possible
could. Letting the tank sit in the sun won't dry it. Letting it sit
for 10 weeks won't dry it. You need to introduce warm moving air to
dry the internals. I removed all the tape and stuff sealing the
various holes on the tank. I set the tank up with a hair dryer set on
low w/ heat blowing into the main hole. I left it blowing warm air
into the tank for around 4 hours. The next day I let it blow warm air
in half hour intervals about 3 or 4 times. Then, when I was ready to
seal the tank, I let it blow cool air for an additional 2 hours. I may
have overdone the air thing, but I wanted to take no chances. I wanted
this done right.

Sealing the tank

After the hair dryer this step seems anti-climatic. I resealed the
openings, this time merely with duct tape. I poured the contents of
the sealant can into the tank. It is the consistency of paint with a
heavy fumes. DO NOT GET THIS STUFF ON ANYTHING ELSE. If you do wipe it
off IMMEDIATELY. It won't come off once dry. I'm serious. Wear gloves,
because you'll be wearing a for weeks if you don't. Ordinary paint
thinners do not work with it. It can be thinned with the POR-15
specific thinner (not available in this kit as there is no need for
it.) Agitate the tank again in slow motions allowing time for the
POR-15 to coat the interior. I took about 45 minutes to be sure. On my
tank there was no easy way to get the excess POR-15 out due to a
collar around the interior of the main filling hole. I used a turkey
baster to remove the excess. I also blew compressed air into any
small diameter tubes/holes to be sure that I don't develop a
restriction or clog due to a cured POR-15 blockage. I set the tank
aside to dry/cure. A well ventilated area is a must for this. I
installed an exhaust fan in my bathroom window and let the tank sit in
there for the night while the most fumes were present. I also let the
tank sit upside down so that any excess POR-15 that I couldn't remove
would puddle in the air pocket that is always present, even in a full
tank of gas so my fuel capacity wouldn't be effected. If you have
leaks at the seams of your tank, you might want to consider letting
the POR-15 cure so that it puddles into these areas, sealing them
forever. The tank is fully cured and ready for gas after 4 days.  Mine
is completed now with a ROCKING coating ready to go.

So that is how it went. It is a time consuming process. It is not
*DOWN AND DIRTY* quick and easy. but guaranteed, if you do it right
you'll never have to do it again. While not being difficult it is also
not "simple". You do need to take your time and be careful, especially
to fully dry the tank with warm moving air. You *CANNOT* be in a
rush. Leave about a week of off and on work to complete the task. But
the results are worth it. If this coating/finish is anything like the
other POR-15 products I've used that nothing short of an A-Bomb will
effect it. This is the only permanent fix I know of short of buying a
new tank. At the price of $29.95 and a week's worth of time I'd say it
is worth it.
Naval Jelly
A pink phosphoric acid based gel for safe and easy removal of rust
from iron and steel. Naval Jelly is useful for preparing metal
surfaces for painting. Paint will adhere better to iron and steel
surfaces when cleaned will Naval Jelly. It is also an ideal
pre-treatment for all galvanized surfaces prior to painting.
For general cleaning of iron and steel, apply full strength with a
paint brush, roller or sponge. Allow a dwell time of 5 to 20 minutes
depending on the amount of rust to be removed. If heavy encrustations
are present, use a wire brush to clean before applying. In severe
conditions, it may be necessary to apply Naval Jelly several times. If
this occurs, allow a longer dwell time, overnight if possible.
The product is 100% soluble in water. Can be neutralized with a
baking soda paste.
There are two main reasons for using phosphoric acid for rust removal:
It dissolves rust at a much faster rate than it dissolves iron, and it
leaves a nice iron phosphate coating on the clean metal surface. The
reactions are: (a "_" before a number means to subscript the number.)
(1)       Fe_2O_3 + 2 H_3PO_4  -----> 2 FePO_4 + 3 H_2O
fast

(2)       Fe    +  H_3PO_4  -----> FePO_4 + H_2 (gas)
slow
In reaction 1, the rust (Fe2O3) gets turned into iron phosphate and
water; this mostly gets washed away when you rinse the part. The
phosphate part of phosphoric acid is responsible for this reaction.
Reaction 2 is the reason you may see some bubbles. The iron itself is
actually dissolving, but this is a relatively slow reaction. The H+
ions from the phosphoric acid are responsible for this reaction.
You're not going to lose any worthwhile amount of metal to this
reaction, but this is also the reason you don't leave the acid on the
part for more than about 15 minutes. The layer of FePO4 that is left
on the surface adheres strongly enough due to surface effects that it
does not wash away with the rinse, hence the good protection from
further rusting. (Note: reaction 1 is a simple exchange, 2 is
oxidation-reduction; i.e. Fe+++ ---> Fe+++ and Fe(0) --> Fe+++.)
3M Underseal Rubberized Undercoating
From the can, "Sprays easily, dries quickly, and provides a very
tough film that is resistant to abrasion. Remains flexible, Ideal for
coating repair areas, such as wheel wells, trunk areas,
undercarriages, and floor pans".
- Remove all rust scale, oil and grease from surfaces to be coated. Surface must be clean and dry.
- Apply to bare or primed metal.
- Shake well.
- Hold can 10 to 12 inches from surface and apply a uniform coat. Allow product to dry 3-5 minutes, then apply 2nd coat.
- After use clear nozzle by inverting can and spraying until free of material.
- Air dry a minimum of one hour before applying additional paint. Use of a flex agent is recommended if painted with enamel or lacquer.
Ospho
The active ingredient is phosphoric acid.
Ospho is greenish liquid with the consistency of water. Brush or
spray it on rust after just knocking off the loose scales and it
pretty much stops rust dead. It also leaves no residue. There is a
product called "Neutra-rust". It may have ospho as the active
ingredient but its in a milk-like base that changes from beige to
blue/green when applied. It then leaves a sand-able coating.
See
Hillman Marine. (No idea if these guys are relation to me).
Ospho stops rust, prepares rusted surfaces for painting. Ospho is a
primer-not a paint. You do not have to remove tight rust. Merely
remove loose paint and rust scale, dirt, oil, grease and other
accumulation with a wire brush. Apply a coat of Ospho-let it dry
overnight, then apply the paint. When applied to rusted surfaces,
Ospho causes iron oxide to chemically change to iron phosphate - an
inert, hard substance that turns the metal black. One gallon covers
600 square feet.
part#    description
1280-011 ospho 1-qt
1280-01  ospho 1-gal
Snee Rust Dissolve. For removing rust and scale; for best
results, remove dirt, old grease and oil and heavy soil foil from
metal surfaces. Rinse thoroughly with clean clean water and apply
rust treatment. Allow to react for 5 to 15 minutes to dissolve all
metal oxides. for heavy rust and corrosion, wire brush surfaces to
remove scale. Allow surfaces to air dry completely. Apply primer
paint.
part#    description
1280-05  rust dissolve 1-gal
1280-055 rust dissolve 5-gal
Wonder II Clean away excess dirt, oil and grease. Remove loose
rust, scale and flakes with a wire brush. Apply Wonder II. To form
a protective coating, allow to dry completely without rinsing
(5-10) hours. For heavy rust repeat application.
part#    description
1280-06  wonder II
|


