|
Rear Spring Plate Bushings
The rear suspension components include a flat spring plate with a
tubular torsion bar carrier welded on and rubber bushings on both
sides, a rear bearing cover and a torsion bar. Last weekend I took the
rear bearing cover off to inspect the rubber outer rubber bushings on
both the right and left sides.
Over the years the rubber bushings have sagged to the point that both
bearing covers are rubbing against the torsion bar carrier (carrier is
not the correct name for this part). The rubber bushings are supposed
to center the carrier in the bearing cover. Both rubber bushings are
shot. The outer ones are replaceable, but the inner ones were
originally vulcanized to the carrier. The factory expects you to
replace the entire spring plate with the attached inner rubber bushing
at a cost of over $300 per side.
For $70 you can get a set of inner and outer after market plastic
bushings for both sides. These are commonly used for competition and
are not ideal for the street. They are harder than the rubber and as a
result do a poorer job of insulating the body from the
suspension. Further they will tend to squeak as the lubrication washes
away. I installed these rather than spending $700 on new spring
plates.
At the bottom of this page are 4 pictures taken while putting in the
new plastic bushings.
Pictures
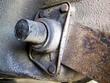
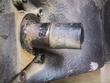
| The rubber bushings have sagged to the point that the torsion bar
carrier is against the bearing cover. The bushings need to be
replaced.
|
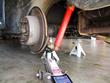
| To remove the bearing cover, the spring plate must be unloaded from
the bottom-most bolt. This bolt even has a replaceable metal
bushing. Place jack-stands under the torsion bar tube to support the
rear of the car. Then you can lift the suspension at the lower shock
attach point which will allow the bolts to be removed from the bearing
carrier without any tension from the spring plate.
|
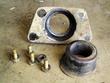
| The bearing cover is needs cleaning up, but has no rust. There was an
article in the Aug 1989 Pano (Up-Fixin der Porsche Vol 8) that
describes replacing these carriers because they had rusted through.
You can see that the rubber bushing is permanently distorted and needs
to be replaced.
|
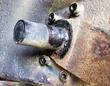
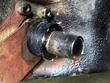
| Here is the torsion bar carrier welded to the spring plate. Notice the
accumulated rubber + dirt + scale on the carrier surface under the
rubber bushing. When new bushings are installed, this area will have
to be cleaned up.
|
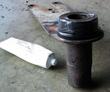
| This shows the spring plate detail on the right side of the car. I
have knocked some of the accumulated rubber and scale off before the
picture was taken. Notice the wear mark on the carrier from the
bearing cover rubbing on it because the rubber bushings have sagged.
|
| To replace the bushings, the spring plate must be free from the swing
arm. This is done by first removing the lower end of the shock. Then
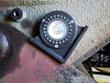
the four connections to the swing arm. Note the position of the two
eccentric bolts which have off center heads. These bolts are used to
for suspension alignment. Next remove the retaining bolts from the
bearing cover and pry it off.
|
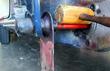
| Remove the body plug and pull the spring plate out. In my case one
side pulled the inner torsion bar connection free and the other side
the outer came free. To free the outer torsion bar, I drilled a hole
in the cap and tapped the torsion bar free as shown in this picture.
|
| Clean up all four rubber bearing surfaces, smear the
silicone lubricant on the new bushings and reassemble.
|
| Reassemble, resetting the spring plate angle the same as it was
(unless you are changing the ride height). The torque values are:
| Bearing cover bolts | | 34 ft-lb |
| Spring plate to swing arm | | 65 ft-lb |
| Camber eccentric bolt | | 36 ft-lb |
| Tracking eccenter bolt | | 43 ft-lb |
| Shock retaining bolt | | 54 ft-lb |
The car should be re-aligned (rear camber and tracking) after this procedure.
|
Last modified: Sat, 11 Nov 2000
Links
|


