|
Brake Piston Repair
Last week-end before the Palo Alto
Concours I asked John Thornton to drive my car and recommend some
changes that would improve the handling. He recommended
new shocks, brake pads and replacing the seals
on the brake caliper pistons.
Pads are replaced by pulling of the retaining pins and sliding the
pads out. Worn pads take less space between the piston than the disk
than new ones. A large screw driver can be used to pry the pistons
back into the cylinders providing space for thicker new pads.
My first caliper was used for learning the process. By the time I got
to the last it was straight forward if tedious.
In general,
- One wheel is done at a time. After that wheel is done and remounted
and the pads replace, then do the next wheel. This insures you can
use the brake system to help free a stuck piston for any wheel without
needing to bleed the entire system.
- The pistons are removed one side of the caliper at a time. After the
piston on that side is complete, then attention is turned to the other
piston.
- Conventional wisdom says, do not split the calipers. It is difficult
to put them back together without them leaking. An exception may be
the rears which have an outside line and two bleed screws.
- The pistons need to be oriented before they are put back into the
cylinders.
- A pressure bleeder is a big help in bleeding the brakes with just
one person.
- When doing the final adjustment, the pads should be removed, the
pistons extended with the brake pedal and then the pistons pushed back
just enough to put in the pads. If this is not done, the brakes will
be soft as though there is still air trapped in them.
|
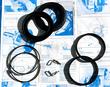
A piston kit has parts for one caliper. Including
a square seal that fits in the cylinder, a rubber dust boot and a
steel retainer ring to hold the dust boot on the piston and
caliper. In addition there are two retaining clips for the pins that
hold the brake pads in place.
|
|
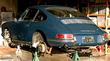
I jacked up the car and put four jack stands under
it. Now all four brakes can be done.
|
|
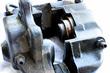
The procedure for putting new seals in the pistons
normally is to remove brake pads, push the pistons to the brake disk
by pumping them out with the brakes and then removing the the
caliper. Then restrict one piston from movement. Blow out the other
pistons with air pressure. Clean this one up and replace with new
seals.
|
|
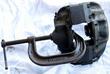
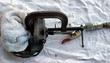
A 'C' clamp is being used to hold one piston in
the caliper so the other piston can be blown out with air pressure.
|
|
Here is the setup ready to blow the next piston
out of the caliper. It is well wrapped with rags to prevent brake
fluid from being blown all over the shop and you when the piston comes
free.
|
|
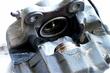
The piston has come out and both the cylinder and
piston can be cleaned up.
|
|
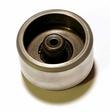
Here is what all of my pistons looked like when
they popped out of the caliper. Some 400 grit emery paper polishes up
the surface of the piston so it looks new.
|
|
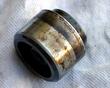
Here is the out side of the piston. This side
presses against the back of the brake pad. Notice the section of the
outer raised portion which has a flat cut in it. The flat must be
oriented with respect to the travel of the disk.
|
|
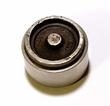
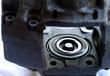
Here is the back side of the piston. The center
hole rides on a pin in the center of the caliper opening.
|
|
Here is the piston after clean up, reinstalled in
the cylinder with dust boot installed. See the text with the picture
for some discussion of orienting the piston.
|
Bleeding the Brakes
This discussion covers more than the 'bleeding' the brakes which
normally just considers removing all the excess trapped air from the
master cylinder, lines and calipers.
A pressure bleeder works well for this application. It is a pressurized
tank that is screwed on to the brake reservoir. You may need to close
the over flow tube with some small vise grips if there is one. The
early cars do not have this hose. Pour fresh brake fluid into the tank
of the bleeder. Screw on the cap from the bleeder to the reservoir and
pressurize the tank with the pump handle to 10 psi.
|
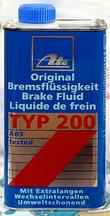
Ate super gold brake fluid. I changed to this
brake fluid because I wanted to purge the old Ate Blue. The color
change shows the system is flushed.
|

|
See the text for the procedure to eliminate spongy
brakes. The final product, new pads and firm pedal.
|
Last modified: Sat, 28 Jun 2003
Links
|


