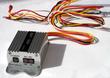
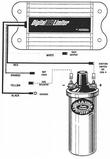
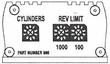
logo
 

Digital Rev Limiter

A rev-limiter is designed to prevent over-revving your engine. All late model Porsches include a rev-limiter included in the engine management system. Destroying an engine by shifting into too low a gear that tries to force the engine to operate beyond design parameters has become a thing of the past.

Speaking of the past, can this protection be added to older cars?

Yes, the product that is often used in the vintage racing community is the Pertronix Digital Rev Limiter.

Normally a street car would never need to have a rev-limiter. But what if you are paranoid about damaging an expensive rebuilt engine? What if you are considering auto crossing the car?
img_6559 The Pertronix Digital Rev Limiter works well with 4 cylinder engines that use a distributer and coil.

It is not suitable for engines with capacitive discharge systems.
img_6563 The wires are too long, so we need some tools to complete the electrical connections.

In addition the unit needs to be mounted to the car. I elected to install it to the inner wheel well panel at the side of the engine compartment. A hand drill worked fine. The instructions suggest a #31 drill or 0.120 in. I used a 1/8 which is within 0.005 of the requested drill bit.
img_6561 Here is the unit mounted to the side of the engine compartment.

The number of cylinders is set to 4 and the limit shown at 5500 RPM. My engine is balanced to racing engine criteria, so the factory red line can easily be met. But, I believe the engine will last longer if a lower value is used.

The coil of wires below the unit includes the orange and white ones.
img_6562 The rev limiter is connected to the coil and to ground. Here is the coil and it's wiring. We are running the red and yellow wires from the rev limiter with the red and black with stripe that are original. We stripped away the plastic shield for the original two and have used some heat shrink tubing for all four wires.
c60-050617 Here we see the connection diagram included in the Digital Rev Limiter documentation.

  1. Attach the BLACK wire to a good engine ground. Make sure to remove any dirt or paint beforehand. We used the ground point next to the voltage regulator.
  2. Attach the RED wire to a 12 volt power source controlled by the ignition switch. We are using the wire to the coil.
  3. Attach the YELLOW wire to the coil's negative terminal.
  4. The ORANGE wire is not used.
  5. The WHITE wire is a tachometer output but is incompatible with the 912 tachometer according to my tests.
c59-050617 All settings can be done externally through the rotary switches on the front of the rev limiter. A white dot on the rotary portion of the switch indicates the switch position. Use a small flat blade or Phillips screwdriver to make adjustments.

  1. Rotate the cylinder selection switch to 4.
  2. The Digital Rev Limiter is not designed to be used as a governor. If the limit is set too low, and the engine RPM is allowed to push up against the rev limit, failure to the Digital Rev Limiter or engine may result. Choose a desired rev limit. The Digital Rev Limiter has a 100 RPM resolution. This means that the rev limit can be set between 100 and 9900 in increments of 100 RPM. A typical limit might be 5500 to 6000 RPM for our old and expensive engines. By turning both switches to 0, the rev limiter is rendered non-operational.
Last modified: Sun, 17 Jul 2005

 Links

Site Details. Disclaimer. Comments? Questions? Dave Hillman
Content attribted to others remains their property. Otherwise the text and images are licensed under a Creative Commons License.
Creative Commons License Valid XHTML 1.0 Transitional Valid CSS!