|
Pedal Cluster
The brake pedal has a bit of stickiness in its motion as if the
bushing surfaces need lubrication. The pedal has side-to-side play. I
opened up the area to investigate and found that the brake and
throttle pivots are loose. The plastic bushings have worn out and
disappeared into dust.
I called Gabe at Strasse who said I needed a bushing kit which he had in
stock.
The clutch seems tight. The brake and throttle still work fine and the
problem will not cause either to fail anytime soon.
I also found a bit of surface rust next to the gas pedal which was
cleaned up.
The Repair
The cluster must be removed from the car to repair. Two bolts closest
to the driver are removed and then two more nuts and washers must be
removed under the car. The latter holds the brake master cylinder.
Access is gained by jacking up both sides of the front of the car and
placing on jack stands. The protective metal shield that covers the
steering rack is first removed to gain access to the bolts.
The throttle cable pops off its fitting. The clutch cable clevis must
be removed. Access to these two cables is through a hole at the
front of the center tunnel.
Take it apart, clean it up, and replace any remaining plastic bushings
with the new brass ones. Be sure to use lots of grease on the sliding
parts while re-assembly.
Next we put it all back together and adjust the clutch and brakes.
The real story
The above sterile description does not give these projects
justice. You can skip the bit that follows if you are not interested
in the silly details.
I always take two garage spaces, so Asha's Boxster has to be
moved. Extra light is good, so rig the extension cord and the
fluorescent trouble light. There is accumulated dirt after 34 years
requiring an electric portable vacuum cleaner. The tools are handier
if the tool box is rolled nearer to the car. The car was jacked up and
placed on jack stands. A bunch of parts and pieces are taken from the
interior of the car. The project was not complete in one session
partly because Christmas got in the way, so all this had to be
cleaned up so the Boxster could be put back in its space when not
working on the 912.
To work on the pedals, your head and hands need to be where your feet
normally are. It helps to remove both the drivers seat and the
steering wheel (14 screws - don't loose them). I never did figure out
the best place to leave those parts of my body that are connected to
the head and hands, but there are sore spots in places that can't be
explained a day later.
Both front floor mats and wooden foot rests have to be removed. The
passenger's side wooden rest is removed to let us remove the center
tunnel cover and a fiber pad that covers the access hole at the front
of the tunnel. I seem to be missing the 10 mm nut and little metal
plate that secures one of the wooden foot panels.
I removed one of the front tires and put the front on jack stands to
ease access to the panel that covers the steering gear and master
cylinder under the car. I think this car has had the wheels off more
times per mile than a club racer. Asha is convinced that the first
step for any activity on the car is to remove one or more wheels. I
use a screw driver to pop off the hub cap that I like to put on a
cloth rag to protect the enameled emblem and use the inside to collect
the lug nuts. A 1/2 in. breaker bar to make the first turn on the lug
nuts. Then spin the nuts off with one these cross shaped wrenches. To
replace, torque the nuts with a 1/2 in. torque wrench set to 94
ft-lbs. I used to use the torque wrench as the breaker bar but the
ratchet gears inside are not that strong. It still works fine as a
torque wrench.
The sheet metal cover is secured at the ends of the large tube
connecting the rear ends of the front torsion bars. Two nuts and two
bolts secures the sheet metal. You are smart if you plan ahead enough
to make only one trip under the car. After all, there are only 2 17mm
bolts, 2 22mm nuts and 2 13 mm nuts for the master cylinder. I'm not
that smart.
With the front of the car jacked up, the door won't stay open.
Once I got the cluster out of the car, it had to be taken apart. The
clutch and brake pedals work independently. This is done with two
concentric tubes and a shaft. The inner tube is fixed. The shaft
rotates inside the inner tube and is for the clutch. The large
diameter brake tube rotates around the inner tube. The clutch arm is
held on to the shaft with a roll pin. I first tried to knock the pin
free with a hammer and drift punch but it would not budge. Then I
drilled out one end until the drill was too dull to cut the metal. At
least the drift pin is now captured in the hole but it would not
budge. My brother dropped by and expressed his amusement. Giving in to
the inevitable we took it all to an automotive machine shop that has
the proper press to do the job correctly. The mechanic handed it back
with the pin removed, but said the clutch arm was still stuck on the
shaft. True.
We tried a gear puller to break the arm free from the shaft but that
didn't work. There is a nice indentation on the end of the shaft from
the effort however. How about heating the clutch arm with a torch? I
don't have a torch.
Rather, I didn't have a torch. The combination of my brand new propane
torch and the gear puller finally worked, particularly after the
remaining plastic bushing melted enough to provide better clearance
for the gear puller.
I cleaned up the metal pieces with a dremel, sandpaper and a rotating
wire brush. There is brown color in the kleenex after blowing my nose
that evening.
A quick spray with primer and it is time to get ready for Christmas
guests.
Putting it all back together took much longer than might be expected.
There were the inevitable multiple trips under the car to replace 4
nuts and 2 bolts. The other end of the clutch cable has to be removed
to provide enough slack to put the clevis back on the clutch arm. Jack
up the front to remove the jack stands, and jack up the other end of
the car and remove the right wheel. You'll need two 11 mm box end
wrenches to provide enough clearance to replace the cable on the
clutch throw-out bearing arm. Access is on the right side of the car.
I cleaned up some more surface rust in the tunnel and sprayed with
primer.
The fixed tube of the pedal assembly is held on to the bottom plate
with a 13 mm nut and washer. It is best if this nut is put on before
mounting on the car because there is little clearance for a wrench
behind the clutch shaft next to the indentation in floor. A reminder
might be to keep the nut and lock washer close to the other pieces
when fitting the new bushings so it does not take 15 minutes wandering
through the house trying to find them. As I've already mentioned I'm
not that smart. I had visions of having to start over, jacking up
the front of the car, etc. just to get enough space to tighten one
nut. Luckily I found a 13 mm box end wrench with enough offset to do
the job.
Now put it all back together enough for a test drive. Throttle cable,
clutch cable, center panel cover, floor boards (where did that
retainer disappear)?, seat, steering wheel. Adjust the clutch cable
tension at the other end. Replace the wheel and drop the jack.
Oh, I forgot to adjust the brake pedal distance to the master cylinder
and the steering wheel is crooked. Redo both. Replace the floor mats
and another test drive. Finally clean up the garage again to make
space for the Boxster.
A day later I adjusted the clutch again because it was engaging when
the pedal was very near the floor. This was done by tightening the
adjustment at the clutch end of the cable a couple of turns.
Amateur!
Pictures
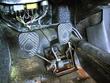
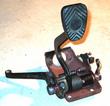
| View of pedal area. The gas pedal has been removed. The minor surface
rust spot is next to the gas pedal mounting holes. I had not known
about the relays behind the pedals.
|

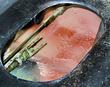
| Another view after cleaning up the rust - which was just on the
surface. The throttle pivot point is the tube behind the right end of
the brake pivot.
|

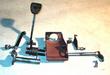
| This is the pedal cluster bushing kit. The bushings are bronze, not
the plastic like the originals. Be sure to grease them liberally on
re-assembly because they are not self lubricating. The kit is complete
- all required pieces are included.
|
| The major problem in this whole project is removing the clutch arm
from its shaft. It was frozen together.
|
| The parts were cleaned up with a wire brush. The bottom plate was
painted with Rust-Oleum primer. Bearing surfaces were sanded with very
fine paper. I added a zirk fitting to the outer shaft to enable a
grease gun to add more grease at some future time.
|
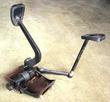
| Right side view of the assembled cluster.
|
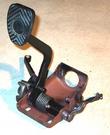
| Left side view. Hidden behind the right angle of the clutch arm is a
fixed bolt and nut that holds the fixed inner tube to the bottom
plate. Still remaining is the clutch pedal, a bit of paint, assembly
and final adjustment.
|
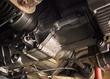
| A view into the access panel in the center tunnel. Some surface rust
has been cleaned up and painted with Rust-Oleum primer. The throttle and
clutch cables are plainly visible.
|
| The clutch is adjusted at the engine end of the the clutch cable.
|
Last modified: Sat, 04 Aug 2001
Links
|


