|
Elephant Racing Rear Bushings
At the German AutoFest we had a chance to
talk to Chuck Moreland of Elephant
Racing about their
PolyBronze Suspension Bearings which were advertised to work on the
early short wheel base cars like mine. I've not been happy with the
replacement bushings
but they have been on the car for 33,000 miles so I really can not
complain. The biggest problem with these are they are noisy and I've
pulled them out to regrease, which works for a while. Luckily there
are more choices for standard bushings now than when I bought mine in
2001, ones with more compliance.
But I decided to go another way and to get the Elephant Racing poly
bronze bearings.
Both the hard plastic and products such as the Elephant Racing
bearings have a reputation for being harsh riding. Perhaps so, and I'm
not really not a judge because I've never had 'correct' ones installed
in my car. I will say these new ones ride better than the hard
plastic ones they replaced. I do not find them harsh.
|
Important If you want the ride height to
remain the same after this operation and the rear geometry not to
change, take some measurements as you are disassembling the suspension
so you can put it back together the same way. I made three
'measurements':
- I spray painted the end of the spring plate to
show there it matched the banana arm.
- I measured from the bottom of the spring plate - where the lower
bolt is attached to the banana arm - to the floor.
- I pulled the spring plate off the torsion bar leaving the inside
splines attached to the car. Then I put a piece of tape on the outside
end and marked a vertical line on the tape.
|
|
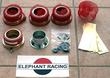
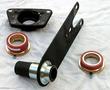
Here is the kit. Instructions, a decal, two inner
and two outer bushings, Some shim stock and some 5 mm thick
washers. Each bushing is a two pieces as shown in the second row, a
bronze outer bearing wrapped in a dense poly-urethane outer surface and
a steel inner sleeve.
|
|
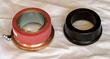
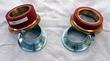
The first thing we discovered is that the inner
bearing is smaller than the outer. The outside diameter of the spring
plate carrier is the same for the inner and outer since it is
constructed by welding a tube that passes through the actual spring
plate.
|
|
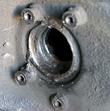
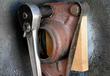
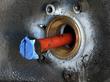
Here is a view of the socket for the inner
bearing. You can get an idea of the depth of the cavity by comparing
with the diameter. This feature changed over time. The parts book
shows a change from replaceable bushings to vulcanized ones starting
with 911 chassis number 307-325 and 912 chassis number 354-938 at the
end of the 1967 model year. I suspect the dimensions of this cavity
changed at that time.
Notice, there are some imperfections in the socket left over from
welding the body together. I ground these down with my air driven
cut-off wheel so the bronze bearing would have a flatter surface to
mate against.
|
|
Here we see the steel sleeves are fitted on the
spring plate. The kit comes with shims of varying thickness that can
be placed under the steel sleeves. I used 1 mil on one side and 4 mil
on the other. These are the drivers side parts.
|
|
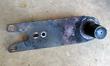
Here was the passenger side spring plate before
cleaning.
|
|
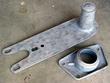
And the same after sand blasting. This part
required thicker shims. Obviously the sand blasting removed a couple
of mils of material from the plate.
|
|
By the next morning the problem with the oversize
diameter was fixed by cutting off the end of the inner bearing,
including the sleeve. (Extra ordinary customer service! Lucky for me,
Elephant Racing headquarters is just a few miles from my house).
|
|
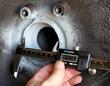
The next problem found became obvious with a trial
fitting of the inner bearing into the socket. The inside diameter is
about 69.5 mm.
|
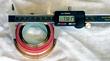
|
And the outside diameter of the poly-urethane cover
is 73.8 mm. Much too large to force into the hole.
|
|
In proper backyard mechanic style, I fixed the
diameter problem a bit at a time with a grinder that has been in the
family since at least the 1960s until the outside diameter was 70.5 mm
and the bushing could be forced into the socket.
|
|
Finally the bearing could be forced into the
socket with the aide of a block of wood and the outside cover. This
technique does not guarantee the inner bearing will be parallel with
the mounting surface for the plate, but you want it to be as close as
possible.
|
|
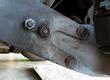
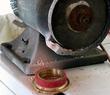
Now the torsion bar can be replaced, orienting it
in the direction it came out. You can see the bearing is seated in the
cavity with the zirk fitting toward the front of the car. This
position provides access in order to fill with grease after the parts
are all assembled. Here was my experience
with the grease gun.
Final assembly was complicated for me because the design works when
the two bearings are concentric. I was not able to grind the inner
bearing perfectly round and concentric which caused the cover plate
not to line up with the mounting holes. I needed a bit of freedom in
position which was achieved by drilling out the mounting holes and
placing washers under the plate of different thickness at each of the
four corners. Measuring the distance of the plate to the stand offs
mounted on the car was used for each of the four bolts. I made a trip
to the hardware store to get a hand full of washers and then used a
couple of the original thicker washers mounted under the plate.
|
I've now driven the car for a few days and still notice two
improvements. First the rear suspension is much quieter than
before. Second it rides better (although this is quite subjective and
could be because of the elimination of the suspension noise). I like
the solution very much and recommend it.
There are some changes required in the product design to fully support
the 65-67 cars. I hope there is enough demand to justify doing that.
Elephant Racing is developing on some front suspension bushings of the
same basic design for the short wheelbase cars. I expect to be a very
early customer for these.
|


