|
Changing Window Seals
Earlier we changed the seal between the
door and the window.
This fix covers the U-channel window seal and the rubber seal on the
vent window.
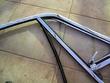
| The felt seal that the main door window slides in is replaced easily
and is not expensive. Removal of the window frame is required. Once
the frame is out and safely on the floor, grab one end of the rubber
material with pliers or lift with a screw driver and pull it out.
|
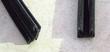
| The old seal is on the right. The seals are the same in my case. I
suspect they had been changed once before.
To replace, start at one corner and press it in to the channel. I
used a screwdriver to help the process.
After installation, spray some silicone spay lubricant in the channel
to let the window slide more easily.
|
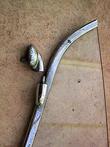
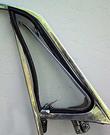
| The vent window repair cost a week of down-time for the car while I
waited for new parts, shown here.
The pin that fits in the upper hinge had seized and frozen. It finally
broke when I took the vent window out of the frame, held on by the
smallest of connections. I ordered a used vent window from Part
Heaven. After it arrived without the hinge, I requested that and had
both pieces in 4 days.
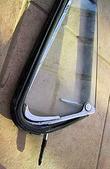
Removal is easy if you know how. Grab the rubber at the top of the
vent with a pair of pliers and pull it out of the channel, down and
towards the inside of the car. Now remove the nut on the inside of
the channel that holds the upper hinge on the frame.
|

| To reassemble, first rub some glycerin on the rubber seal so it will
not be too hard to push into the frame.
|
| Now slide the pin at the bottom of the vent through its hole the
rubber seal. You can now feed the pin through its hole in the bottom
of the frame. The upper portion of the rubber should be free on the
inside of the frame. The vent should be to the outside of the
frame. Push the rubber seal into the channel at the bottom of the
window so the bottom edge of the vent window is in its proper position
relative to the upper hinge.
|
| Put the hinge on the vent window, the threaded portion into the frame
and place the washer over the threads and screw on the nut and tighten
with a 7mm wrench. I put a drop of locktite over the protruding
threads so the hinge would stay tight.
Now the rest of the rubber can be pushed into the slots. There are
prominent grooves in the rubber that fit in the channel easily when
the rubber is treated with glycerin.
Next install the friction brake over the end of the pin. Finally the
frame reinstalled in the door. Before replacing the upholstery on the
door, tighten the brake so it will stay in position in the wind.
|
Last modified: Mon, 01 Oct 2001
Links
|


