|
Todds '67 912 Restoration - May 21 Update
|
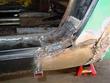
This is the drivers side jointing area where the new rocker mates up
to the door jam area. I had to actually hang the door back on to
ensure that I got the "right" line. That would be a fatal error if I
was off on this measurement. I wouldn't be able to undo what I
did. You know, the door wouldn't close. This was very challenging!
I had to prep the inside of the flared rear fender and cut fit and
re-cut 4 pieces of 20 gauge metal stock. I purchased the 16 and 20
gauge metal sheets at a local farm/tractor store out here. They were
cheap about 3-5 bucks a piece. The welding it self is very tricky here
and I wanted to make sure you saw this. Easy to blow holes in this
thin metal and difficult to adhere to the fender flare. You can't see
it but there is a ridge line behind the original flare line where the
old was cut out and the flare welded in. More on that when I start in
on the body work.
|
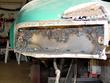
| Here is a shot of the driver's tail light assembly that I spent last Sunday
working on.
The weather was nice and cool (still is), reminds me of the mild weather you
have out their all the time.
I used cardboard as a template and then stuck the lens assembly in place to get
the "right" fit. I used some more of the 20 gauge metal that I bought in
16x24 inch sheets. The drivers side was harder to do, because more rust and
less metal to "tack" to.
For this last 2 welding areas, I have run out of gas so really I'm just tack
welding here. Through the project I have developed enough skill that I could
create enough heat that would self ignite the welding rod to give me a
continuous burn. It doesn't look that pretty but I don't really care, no
body is going to see it when I'm done.
It really has added the strength that I needed through here.
|
|
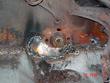
You remember seeing what the heck am I going to do with the old around
the Master Cylinder/Gas Pedal area? You have seen some of the pictures
before, that shows a hole around that area, well here is a shot that
shows yet another patch, boy there sure has been a few patches!
I had to make sure that I didn't burn through this area, again very
thin metal. It was difficult to get here too. Some what I did was use
more 20 gauge metal, trimmed out a piece to fit and wa-yal!
|
|
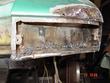
Well this is the last shot of the welding. This is a snap shot of the
passenger rear tail light assembly. Again, I had to due a lot of fitting,
trimming and re-fitting. Even after a had them welded in I had to trim
additional metal off of the quarter inch tab that I built on the outer
edge to mate up against the gasket of the new tail light assembly. As a
rap up of the welding project. I borrowed a buddy's welder (MIG). It
is a very nice one, Snap-on that can run at 90 or 140 amps. I got the
best spark and needed the heat out of 140. I used 3 cylinders of
compressed gas (Size 80 cu ft). The mixture was 75% Argon and 25%
carbon Dioxide. And I used almost 3 big wheels of solid .30 gauge wire
that cost only 21 bucks for a 10 pound reel.
Well Dave, next project is moving on to metal and body prep. Talk to
you later.
|
Last modified: Tue, 21 May 2002
Links
|


