|
Replacing the Quarter Window Rubber
Update
I resently had some restoration work done at
a shop that knows Porsches well. They looked at the installation I
had done on the rubber around the quarter windows and said I had done
it all wrong. No 3M trim adhesive is required.
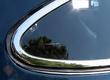
|
The correct way is to beat it on with a plastic
hammer (??). And then they proved it by re-installing the passenger's
side rubber molding. After all the trouble I'd gone through originally
this was pretty curious, but the proof is there in the picture.
|
|
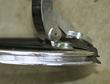
So I took off the driver's side and tried it
myself. The secret is there is a very narrow slot burried in the edge
that is difficult to see. If you try to peel it apart lengthwise you
can find this slot. The slot to the outer edge must be forced into the
slot in the window. To do that, spread some petroleum jelly liberally
on the rubber. Then use a soft faced hammer - mine is rubber - and
pound the edge of the rubber into the slot. You should cradle the
window in your lap while doing this operation. With all the petroleum
jelly on the rubber, put a towel in your lap to keep your clothes
clean.
|
|
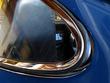
There is a flap at the leading edge of the quarter
window extending toward the inside of the car. This should slip behind
the rubber door molding as shown in this picture.
|
Original article
We finally replaced the rubber molding on the passenger side rear
quarter window. I've been avoiding do it for a couple of months after
fighting with the driver side one. However, it started to buzz at low
speeds. The window seal was old, hard, brittle and broken. Inspection
showed that a piece of the seal about 1 in. long had fallen out and
others were loose and rattling. I had replaced the rubber on the other
side in June. The after market seal we got from the parts supplier is
really not the same design as the original. I do not know if better
versions can be found. The original has a rib that fits snugly into
the slot around the window and does not required any adhesive to
install. The new one has to be glued on with 3M Trim Adhesive.
I have looked at several old 900 series cars at concours events. They
either have the original, which are hard and brittle like mine or this
same incorrect design has been installed.
We were surprised at the big improvement in the higher frequency noise
level this fix made. Engine noise at highway speeds is finally to an
acceptable level. It now sounds the way I remember a 912 should
sound. This is good news.
Pictures

| Remove the window by removing the 4 5mm socket bolts at the front and
3 Phillips holding the rear catch at the back. The window is held at
the front by metal tabs that are perpendicular to the direction of
motion for the car, so gently push the front of the glass outwards
from the inside. You should do this by reaching into the car through
the open door so you can catch it with your other hand if it should
release suddenly.
Clean all the parts including the chrome strip at the bottom of the
window on the car. The factory suggests removing this chrome strip and
replacing the rubber under it. I did not do this step on my car. We
use TurtleWax Chrome Polish to clean all the bright work. You will
need to chip off the old molding if your condition is the same as
mine. I used a slender blade screw driver in the groove to assist.
Try fitting the rubber on the frame before applying any adhesive to
see why we need a better source for this molding. The old molding was
shaped as a mirror image of the frame so it would fit into the
groove. Imagine where the glue must be applied to stick the molding on
the frame for future reference.
Use 3M General Purpose Adhesive Cleaner, part no. 08987 to clean the
surfaces that you will apply the adhesive. These areas must be free of
oil, moisture and wax or the adhesive will not stick.
|
| Use 3M Super Weatherstrip Adhesive, part no. 08008 to glue the new
molding on the frame. I used surgical gloves to protect my hands from
the adhesive. Run a bead of adhesive around the edge of the frame and
on the inner surface of the rubber. Smooth and flatten both beads with
your gloved finger.
You may want to trim the molding. I removed 2 of the small outside
ribs to let the window fit better in the car. After installation there
is more trimming to do.
Re-install the window. There is a rubber flap at the front that should
go under the door sill molding. I trimmed this narrower so it would
stay. I also had to trim back the front outside edge so the door would
not catch it when you shut the door. These trim areas depend on how
your doors and window frames fit - your mileage may vary.
|
Last modified: Sat, 27 Jul 2002
Links
|


