Timing Gear Cover R/R
Removal
- 1. Remove generator (5 En).
- 2. Remove generator carrier.
- 3. Remove distributor and distributor pinion shaft.
- 4. Remove fuel pump (13 Fu).
- 5. Remove crankshaft pulley (47 En). (See Note, below).
- 6. Remove crankshaft pulley shield.
- 7. Remove oil pump (21 En).
- 8. Remove retaining nuts from timing gear cover.
- 9. Remove timing gear cover.
- 10. Remove counter-pressure oil line and rubber plugs.
Note:
To prevent damaging the oil seal in timing gear cover, remove Woodruff
key from crankshaft before wi thdra wing the cover.
Installation
The timing gear cover is installed in reversed order of the above by
noting the following points:
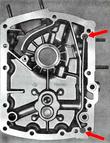
| - 1. Use new gaskets. It should be noted that the three o-rings
provided for sealing the oil galleries between the timing gear cover
and cranckase - (See two a-rings to the left of the timing gear) are
not omitted nor that they fall out when the timing gear cover is
positioned on the crankcase.
|
| - 2. Ensure that the dowel pins are firmly seated.
- 3. Place one rubber plug on each end of the counter pressure oil
line and install in the timing gear cover so that the open end of the
upper plug faces the crankcase while the open end of the lower plug is
inside the timing gear cover (see Fig. 154).
- 4. Inspect oil seal at crankshaft pulley and replace if worn or damaged.
- 5. Use new gasket under generator carrier.
- 6. Torque retaining nuts of timing gear cover to 2 mkp (14. 5 lbs/ft).
|
Last modified: Mon, 17 Jan 2005
Links
|


