|
The suspension must be taken apart enough to free the a-arm which must
be removed to install the new bushings. My Koni's are held on with at
22 mm nut.
|
|
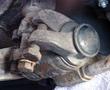
The arm from the ball joint at the bottom of the shock strut connects
to the a-arm. The castelated nuts have to be removed. The bolts
through the a-arm also capture the bottom end of the factory sway bar.
Your car may not have this piece.
|
|
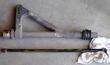
The strut is clear of the a-arm in this picture, held up with a rope
so the brake line is not stretched tight.
The sway bar is clearly shown in this picture.
Now we can remove the a-arm.
|
|
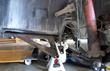
You will need to reset the suspension to the same angle when you are
finished with the job as when you started in order not to change the
ride height. I find that mearuring the distance from the ground to
the A-arm work well. Don't forget to lift the end of the arm so it is
agains the stop before making the measurement.
Rather than writing the distance down on a piece of paper, I just
referred to this picture when reassembling the suspension.
|
|
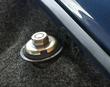
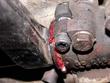
You can see the dark colored plastic cap covering the end of the
torsion bar. The cap is removed to get access to the torsion bar.
The socket head bolt in the left side of the picture clamps the old
rubber bushing. It should be removed. You may have to spread the clamp
with a screw driver to free the bushing.
|

|
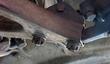
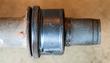
Here the plastic cap is removed, showing the end of the torsion bar
and a snap ring that prevents the torsion bar from working out the
rear of the suspension.
|
|
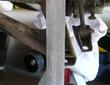
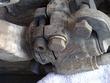
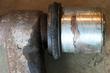
Here the clamp that holds the rear bushing is clearly visible. The
bushing is showing its age with cracks in the exposed section. There
is a thin steel cover over the bushing. That will come free when we
remove the a-arm.
|
|
The front end of the a-arm is attached with three bolts and comes free
when these are removed. Now the torsion bar can be removed to the
front by removing the snap ring and driving out from the rear with a
drift pin. Next the a-arm can be worked out of the rear attament by
pulling from the front and moving it side-to-side.
Notice the steel cover on the rear bushing (which is actually to the
left of this picture). The cover is removed by heating with a butane
torch. It will eventually get hot enough to slide off and then the
bushing can be cut free. It drips molten bushing during this process
and even when cool, liquid decomposed bushing can get on everything in
site. put news papers on the floor. The residual bushing can be
disolved with 3-M spray adhesive cleaner.
|
|
Here is the old front bushing that can be worked off relatively easy
with a large screw driver.
|
|
This shot clearly shows the metal sheild over the rear bushing.
|
|
The factory surface at the rear a-arm is suitable to take the bronze
bushing. Clean it up with trial fittings of the bushing.
|
|
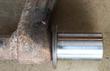
Here is a trial fitting of the bronze bushing. You are done when the
bushing seats nicely against the shoulder and can turn freely.
|
|
Now is a good time to clean up the A-arm.
One end will accept a sleeve from the new bronze bushing. Put brass
shims under the sleeve till it is tight. The other end can be cleaned
up so the bronze bushing will slide nicely over it. I used a lot of
400 grit sandpaper on this step.
|
|
When the rear end of the a-arm is cleaned up and sanded the bronze
bushing will slide on. It will be protected by grease and is renewed
through the zirk fitting.
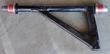
The front end requires less preparation, sliding the sleeve over the
end held in place with shims between the a-arm and the sleeve.
|
|
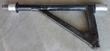
The final a-arm with the bushings is slightly longer at the mating
shoulders than the original. The extra needed space can be gotten by
slotting the front cap. Instead, I ground the ends as shown.
|
|
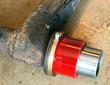
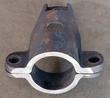
The old metal sleeve must be put over the rear poly bushing before it
is replaced on the car.
I had to replace the hex socket bolt.
|


