|
New Door Lock
The driver's door locking mechanism really
annoyed me. The door had to be shut very firmly (think slammed),
which causes it to get out of adjustment after a time. We've been
messing with for 9 months now.
This note describes replacement with the the factory recommended new
design replacement part.
The door now latches with the authority one would expect.
From the factory manual
When fitting the door lock it should be noted that there are various
designs of lock.  If an old-type lock is locked with the push-button
on the inside of the door and at the same time the lock cylinder on
the exterior door handle is pressed then the lock mechanism can jam.
We recommend therefore that the new model lock should be fitted.

Here the following should be noted:

1. On the new lock the pressure plate which is operated by the
exterior door push-button is located on a continuous spindle. The
pressure plate has a more pronounced angle and increases the
distance from the pressure pin of the door exterior handle.  For
this reason it is necessary to change the operating peg with the
longer pressure pin.

2. It should be insured that the longer pressure pin part number:
901-531-919-20 (left) and 901-531-920-20 (right) does not touch the
lock pressure plate when disengaged. If this is not done there is
the risk that as a result of heavy vibrations on bad roads the
catch can disengage and the door spring open.
The replacement pressure pins with these part numbers are no longer
available from Porsche. We will have to improvise. The problem is
that later keys and the lock cylinder is longer. The pressure plate
has been shifted toward the center of the door to accommodate. The old
pressure pin arrangement will not work correctly - it will not have
enough travel to trigger the mechanism and the pin will not be long
enough to lock the door.
3. As a further safeguard again the door springing open the shape of
the lock peg on the door lock and simultaneously the shape of the
striker plate have been altered so that the lock peg is
additionally supported in the striker plate. The hole of the lock
peg should be enlarged to approximately. 33 mm.

4. A new type striker plate must always be fitted with a new type
lock. Outer edge vertical - if necessary enlarge operating holes in
the lock pillar.
Advice Ignored
The word from one of the local bay area mechanics is that this is a
rather difficult fix. Before we are done with the job probably
considerable expense and time could be saved by replacing our lock
with a used one.
But, it is time for a permanent fix - and besides, "How hard can it
be?".
Not that hard.
|
Remove the both pieces of the door upholstery panels. This is discussed
here.
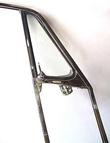
The door lock fits between the window frame and the rear edge of the
door. The frame must be removed before the lock can be replaces.
Remove the window frame by removing the socket head screws holding the
frame to the door. These are found within the door and from the
edges. When all the screws are removed, the window frame can be pulled
out following the same angle as the main window posts.
|
|
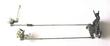
Remove old the door lock with the rods attached. This is easy because
the socket screws holding the parts are visible and obvious.
I used a manual Phillips impact screw driver to break loose the flat
head screws mounting the door lock to the door edge in order to
protect the slots from damage. This proved to be unnecessary because
the mounting screws for the new lock are 6 mm rather than the 5 mm of
the old lock.
The method of connecting the rods to the locking mechanism has also
changed. There are pins in the old design and 6 mm holes in the new.
The rods also have 6 mm holes, but there are small plastic bushings
that reduce the size to match the 4 mm pins on the lock.
I decided to remove the bushings and then used a 5 mm bolt, washer and
elastic stop nut. The washer was treated with a dab of grease and a
drop of locktite put on the end of the bolt for a bit of extra
security. The rods still move freely on their pivots.
|
|
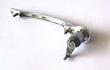
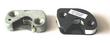
Here you can see the door lock cam on the old and new design. The new
one is larger and will not fit through the hole in the door. As
mentioned by the factory manual, the hole in the door must be
increased to 33 mm (1.3 in.).
|

|
Enlarge hole in door. I used a paper template taped on to the door
with transparent tape normally used for packages to guide the cutting
operation.
I tried several cutting tools on a Dremmel tool. The grinding tools
worked better than the tungsten carbide tool.
Another technique that I considered was to mount a small piece of 1/4
in. plywood in the door using the 3 mounting screw holes to secure
it. Then one could use a hole saw to cut the hole. This thought was
rejected because I could not find a hole saw of the correct diameter
nor one that I had confidence would cut the steel.
The placement of the hole should have approximately the same center as
the old one, but this is not critical. The hole is larger than the
diameter of the new shaft so enlarging the hole slightly off center is
not critical.
We picked up the metal filings inside the door with a magnet.
|
|
The pin which engages the locking mechanism is long enough. However,
the lock tumbler case is short so the outside door release just barely
pushes the release mechanism enough to open the door. I solved this
by replacing the flush head mounting screw with a bolt, placing a
washer under the bold head for slightly more elevation.
|
|
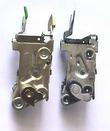
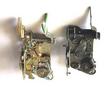
Here are the two lock mechanisms side by side. I did bend the tabs
toward the door handle to ensure the lock pin would engage the tabs.
This probably was not necessary, but seems to have done no harm.
|
|
The new striker plate is thicker than the old, but I reused the shims
that were under the old one. These are a 2 mm factory shim and a
piece of gasket material. 1 mm factory shims were not available when
I ordered the parts.
When mounting the striker plate, the outside edge should be aligned to
the vertical.
|
|
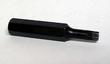
Here is the wrench used to remove the striker
plate, a 12 point 8 mm socket head, 3/8 in drive.
|
Last modified: Sat, 05 May 2001
Links
|


