|
912 Adjust Valves
The valves were dangerously tight when the car was received. When
they are too loose they are noisy. The factory recommended settings
seem correct.
Valve Clearance
Intake: 0.10 mm (.004 in.) - center two valves
Exhaust: 0.15 mm (.006 in.) - outside valves
Tools
- Large crescent wrench to turn crank
- 13 mm box wrench
- Screw driver medium blade
- .003 - .008 in. feeler gauges
From the Owner's Manual
Excessive valve clearance results in a noisy engine and loss of power.
Insufficient clearance reduces performance and results in burned
valves: combustion flashback through an improperly closing valve can
cause a carburetor fire. Consequently, we recommend that the valves
be adjusted in a reputable shop. The valves should be adjusted only
when the engine is cold.
The easiest way to adjust the valves is to follow the cylinder
sequence 1-2-3-4 (see 912 ignition for
diagram of firing order) while turning the crankshaft
counter-clockwise (front to back, right to left). To adjust the valves
of any given cylinder, first bring the respective piston to its top
dead center (TDC) on compression stroke because this insures that both
valves of the particular cylinder are fully closed. When the
procedure is initiated with Cyl 1, turn crankshaft counter-clockwise
until both valves in Cyl 1 have closed and the "OT" mark on the
crankshaft pulley has lined up with the vertical mark on the crankcase
housing (distributor rotor pointing to a small notch on the ridge of
distributor housing).
- Remove the rocker box cover.
- Remove the distributor cap so you can see which cylinder the rotor
is selecting.
- Turn the engine counterclockwise until the TDC mark on the pulley
is lined up with the mark on the case. The rotor will now be pointing
to the spark plug for either cylinder 1 (right front) or cylinder 3
(left front). The cylinder that would be firing will have both valves
closed, so the valves can be adjusted.
- Check valve clearance with a feeler gauge. Error on the high side by .001 on these adjustments. Too tight burns valves. Too loose is just noisy.
- Loosen hex lock nut.
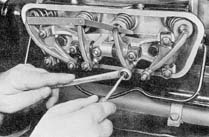
- Adjust the clearance by turning the adjusting screw with a
screwdriver, holding the nut with a box wrench, and checking with a
feeler gauge. With a bit of practice you can tighten the screw till
resistance is felt. This is too tight and you will need to back off a
bit. The feeler guage should just be freed enough to slide out.
- Hold the adjusting screw firmly in place and tighten lock nut.
- Recheck adjustment.
- Repeat the above on all other cylinders in proper sequence
continuing to turn the engine pulley counterclockwise. TDC for each
cylinder will occur after the crank has rotated 180 degrees.
- Mount rocker box cover.
- Start engine and check both covers for possible oil leaks.
Notes:
- Use a large crescent wrench on the 30 mm crankshaft pulley nut to turn the engine.
- Get a spare set of valve cover gaskets to be sure you have a way to re-seal if the old ones leak.
|


