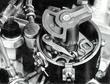
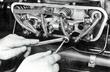
Adjusting Valve ClearanceValve clearance (cold) is:Intake 0.10 mm (0.004 in) Exhaust 0.15 mm (0.006 in) General:Excessive clearance causes valve noise and decreased power. Insufficient clearance results in decreased power, valve overheating or burning, and carburetor flashback which may cause a carburetor fire. We therefore recommend that the valves be adjusted in a reputable shop. The valves should be adjusted when the egine is cold. The best sequence to follow is Cyl. 1, 2, 3, and 4 while rotating the crankshaft counterclockwise. Prior to adjusting, position the piston on top dead center (TDC) on compression stroke since both valves are closed at that point. If adjustment begins with Cyl. 1, turn crankshaft counterclockwise until both valves are closed and the "OT" (TDC) mark on the crankshaft pulley is lined up with the mark on the crankcase. Adjusting:
Links
Site Details.
Disclaimer.
Comments? Questions?
Dave Hillman
Content attribted to others remains their property. Otherwise the text and images are licensed under a Creative Commons License. 

|