|
Lowering
This page is under construction
Starting measurements from the floor to the fender measured on a line
that goes through the center of the hub cap.
| | Front | Back |
| Left | 26.25 | 25.44 |
| Right | 26.50 | 25.44 |
The recommendation is to have 25.5 in. on the front and 25 in. at the
back. The front must be dropped by over an inch while the back by
about a quarter to a half of an inch. This height data is different
than earlier measurements because the tires are a different size. The
diameter of the old tires was 646mm and the new ones 615mm or about 1
1/4 in. smaller.
Adjusting the front height
|
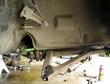
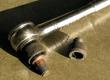
First, I removed out the strut, axle and hub. It
requires removing 2 bolts on the A-arm which connect to the
ball-joint, the tie rod, the nut and washer in the trunk at the top of
the shock and the brake line. The hard part of this operation is
breaking the tie rod free. I used a gear puller which worked but a
tool designed more specifically for the purpose would work much
better.
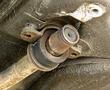
There are three bolts lined up at the back end of the A arm. On the
left is the fine ride height adjustment. We are out of travel and the
height is still too high. The second bolt is one of the attachment
points of the suspension to the body. The third bolt is an 8mm cap
screw that needs to be loosened.
|
|
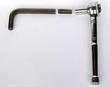
You can cut off the end of a 8mm Allen wrench to
make an effective wrench for the socket head bolt. The Allen wrench
did not have long enough lever arm to break the bolt free.
|
|
Remove the end cap from the front of the
A-arm. Remove the snap ring from inside the tube. You can see the end
of the torsion bar. The bar can be removed by driving out from the
back to the front through the opening shown.
|
|
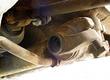
Here is the rear access for the torsion bar. There
is a plastic cap that covers this hole. You can see the snap ring in
the hole that does not have to be removed.
Back the height adjustment screw clear out as shown.
|
|
To get an idea of where the arm should be
repositioned on the torsion bar I measured the angle and took some
measurements. I want to lower the car by 1 inch. The length of arm
is shorter than the total and should be raised from the floor by 3/4
inch. Details of the calculation can be found with the picture.
These fancy calculation details can be safely ignored because of the
adjustment screw. Instead, drive the torsion bar out through the front
till it is free. Then lift the A-arm end until you can find the next
position where the torsion bar will fit into both sets of splines and
put it all back together.
|

|
The adjustment screws are used to fine tune the
height after reassembly. Here we are with the front end too low and
before lowering the rear end. After the picture was taken I raised the
height to 25 in. plus a bit at the fender lip.
|
The next step is to lower the back end.
Measurements
Before we do that, some measurements are in order.
|
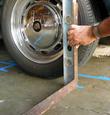
Let's establish the toe-in. Drop a point to the
floor from both sides of the the each tire. I use an old square and a
level to make the square vertical. You can also use a plumb-bob. Mark
the four corners on a piece of tape on the floor, and measure each
side of the square with a tape measure, writing down the
measurements. If you are unsure of your technique, drive around the
block and to it again.
|

|
Pull the rear wheel and measure from a fixed point
on the car to a point on the hub. Changing the ride hieght requires
disconnecting the spring plate from the suspension, so you want to be
able to put it back to the same dimensions.
|
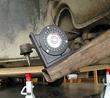
Changing the Rear Ride Height
|
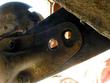
The spring plate is held to the trailing link with
the two bolts on the right. The two others in the center are used to
adjust the suspension, primarily the toe-in.
|
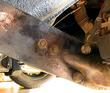
Reassembling
|
The outside of the spring plate before the
adjustment screws are replaced.
|
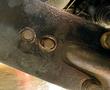
|
The inside view of the spring plate. Don't try to
put your head where the camera was.
|
|
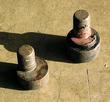
The adjusting screws.
|
|
A 3/8 drive socket may work to turn the screws if
you don't have a large enough metric hex wrench.
|
Last modified: Wed, 01 May 2002
Links
|


