Starter Solenoid R/R
Removal
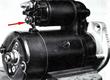
| - Detach wire strand from solenoid.
- Remove retaining bolts of solenoid from the drive housing.
- Pull Starter pinion out somewhat and withdraw solenoid switch. Defective
solenoids should be replaced with new units. It is advisable to install
a new solenoid when overhauling an engine. Do not attempt to readjust
the solenoid..
|
Installation
Note the following at reassembly:
- Hold the cable terminals when tightening the cable retaining nuts in
the solenoid. Tighten the nuts moderately tight since it is possible
to twist the solenoid switch contacts.
- Pull the starter forward so that the connecting end of the actuating
lever moves closer to the solenoid mounting flange, and insert
connecting end of solenoid into the receptacle in the actuating lever.
- When installing a new solenoid switch, adjust the connecting end of
the solenoid plunger so that the distance from the hole center in the
plunger clevis to the switch mounting flange is 1.276 +/- 0.004 inches
(32.4 +/- 0.1 mm) when the plunger is in position.
Checking the Starter Solenoid Switch
When the switch pulls up, travel of the solendoid plunger must be
0.394 +/- 0.008 inches (3 mm) is engagement reserve.
|


