|
Craig's Seatbelt Installation
My seat belt installation was a least
effort activity and has some problems that I have discovered and
others have pointed out to me. Craig Pierce has put new seat belts
where his time and money was. Here is how he did it (reproduced with
permission):
In Craigs' Own Words:
OBVIOUSLY I DID THIS TO MY CAR KNOWING THE IMPORTANCE OF SEAT BELTS
AND THE DANGERS OF A FALSE SENSE OF SECURITY. THIS INSTALLATION HAS
NOT BEEN CRASH TESTED AND IS ONLY AN EXAMPLE OF WHAT CAN BE DONE, NOT
AN ENDORSEMENT OF DOING IT
I hope this brief description along with the pictures will make this
pretty straightforward. Feel free to write
with questions.
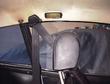
This is either the Holy Grail of 3 point seat belt installations, or
it's a pile of poo. You'll have to decide. See, once the belts are
in you're pretty well committed. The problem is the belts are higher
than they would be from a factory installation, so the angle of the
belt across your body is not optimal. Being only 5'6" tall, the belt
rubs against my neck. I went to Pep Boys (no endorsement!! - but
they're close by) and bought a comfy pad designed for just this
purpose - problem 98% solved. My 8-year-old son has it even worse so
I'm going to find one of those seatbelt bracket/holder/things that
holds the belt in a specific position for smaller people. But all
things considered, I've decided I feel much safer, and the belts are
so convenient I'll actually wear them!
|
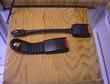
The female belt that came with the EMPI seat
belts, and the set I used from a '96 Hyundai (about 4" shorter). I
didn't like the way the longer belts came so far around my front.
|
|
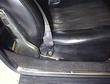
Here is the outside lap attachment, to the OEM
seat bracket.
|

|
Here is the female bolted to the other OEM
seat mounting position.
|
|
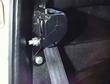
Here is the back of the reel - installed to the
factory car mount. The bracket was included with the EMPI belts and
worked out perfect.
|

|
Another view of the reel.
|
|
This is after I tore the already torn apart
header out of this section of my '66 911 parts car to see what I was
up against. This will become the 3rd point mounting position.
|
|
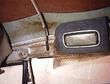
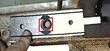
Here is how I marked the hole position. Ultimately
I installed with the little tab toward the back of the car so I
wouldn't risk grounding out the dome light. This is the $10.00
assembly from Andoauto.
|
|
Turns out I needed a bigger hole than I wanted,
and a longer bolt (7/16" x 1.5" - grade 8) But once I bit into the
Andoauto bracket, everything tightened up very well.
|
|
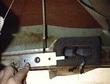
I had to modify the Andoauto bracket. Here is an
attempt at showing the bolt (red) and welding (blue) (all behind), and
where I had a local machine shop cut 3/16" off each side for
clearances (black).
|
|
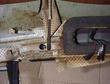
Having found the correct size bolt I needed, machining
the brackets, and successfully mounting the assembly into the parts
car, I used the exact same process in my 912. This is once the bolt
was tightened, all I had to do was get that darn coat hanger wire out.
I used the coat hanger wire to manipulate the bracket behind the
drilled hole, lining the Andoauto bracket up with the hole in the car,
the seat belt bracket, lock washer and bolt required the longer bolt
to get a bite on the threads.
|
|
the finished 3rd point.
|
|
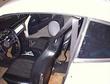
finished installation from outside the car
|
|
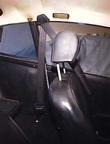
Shows the finished belts from inside the car.
|
Last modified: Tue, 02 Jul 2002
Links
|


