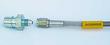
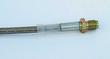
logo
 

912 Brakes

The first time I drove my new 912 I knew the brakes were a high priority item. They were spongy and not very effective. The previous owner thought that bleeding them would be sufficient. After some reading about brake problems which describes old brake lines that swell shut on the inside, I decided to buy new ones.

Steel braided brake lines come in two levels of quality. Normal ones had problems passing some sort of whip test with the Department of Transportation. There are DOT certified ones which have about a $30 premium.

Parts


Part numbers, descriptions are from Strasse unless otherwise noted. The owners manual recommends 'ATE Blue' brake fluid. This is about the 3 times the price of ordinary DOT 3 fluid. The material selected is compatible with DOT 3/4 according to the information on the can.
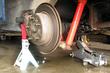
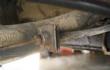
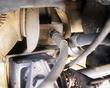
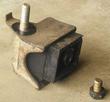
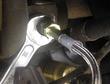
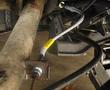
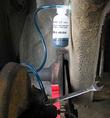
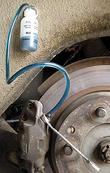
 Part Description Cost
 BL9168D Brake Line Kit 911.912 65-68 $84
 BF4212 Brake Fluid ATE Blue $11
 313955.1 M7-1.0x33.8MM Brake Bleeder valve from Kragen $2


Installation


The front lines are relatively easy to replace. The body end is held in with a U shaped sliding clip that fits into a slot in the fitting. You can rotate the clip 90 degrees by tapping a notch in the outer corner of it in order to get access to the back side. Use a drift punch and hammer.

Access to the rear inboard line fittings requires removal of the rear engine mounts. The drivers side brake line seems to be the hardest to remove.

The front left bleeder valve could not be opened with a wrench out and was replaced. An 'easy-out' from my brother Rick worked to free it in combination with water pump pliers. Found several metric bleeder valves from Kragen, one of which fits. See the part number above.

I replaced lines and flushed the fluid, using the ATE Blue as a replacement.

There are a number of references on the WEB to frozen caliper pistons. I do not believe this is problem on my car so I've not torn them down.

Update (12/26/2001)


I was reminded by some email that I still had one brake line that I had not changed.
122401-535 The brake lines I bought come in two pieces. This end attaches at the brake caliper end.
122401-538 This is the end that screws into the inboard fitting.
122601-579 Here is how I supported the car to replace the rear brake lines. I jacked up the car and put the jack stand on the torsion bar carriers. Then replaced the jack under the rear transmission mount in order to support the transmission so the motor mount could be removed.
122601-569 The brake end of the flexible brake line is mounted on the leading suspension arm. It is held in place by a clip that has to be removed with a hammer and punch as described above.
122601-570 This is the other end of the flexible line hidden behind the motor mount shown in the lower left portion of the picture.
122601-582 Remove the motor mount and its carrier by taking out the rear facing bolt (17mm socket) and the vertical bolt (17mm). You will probably want to adjust the jack slightly to remove any side loads on the assembly.
122601-572 View of the inboard end of the brake line after the motor mount was removed. Unlike the outboard end, this fitting should not come off the flat carrier plate. Instead it unscrews at the narrow part to the right of the plate. There is just enough room to fit a thin wrench on the left (inner) fitting as you can see in the next picture.
122601-575 A thin 14mm open end wrench worked well for the inner fitting next to the plate shown clearly in the previous picture. Another 14mm open end wrench was able to break the fitting loose. This fitting was originally frozen so I spayed some liquid wrench on the fittings and drove the car for a while (about a year and a half) before trying again. It came apart easily this time.
122601-580 Here is the final view of the new line just before re-installation of the engine mount.
123101-617 Here we are bleeding the brakes with a 'one-man' brake bleeder. The bottle has a magnetic pad on it so it can be placed above the bleeder fitting. The tygon tubing is squeezed on the bleeder nipple and then enough fluid is pumped out of the caliper to eliminate all the bubbles.
123101-619 The other half of the caliper should be bled also. The recommended quantity recommended to be pumped into the bottle will fill the bottle up to the label.
Last modified: Mon, 24 Dec 2001

 Links

Site Details. Disclaimer. Comments? Questions? Dave Hillman
Content attribted to others remains their property. Otherwise the text and images are licensed under a Creative Commons License.
Creative Commons License Valid XHTML 1.0 Transitional Valid CSS!