|
Adjusting Toe-in Using Tape Measures
Fellow 912 owner
Sterling Vaden was the inspiration for this article. He showed the
use of an angle iron to do toein measurement.
This discussion emphasizes the rear wheels because for the last go
around, they needed correction and the front wheels did not. But the
identical measurement is used for the front wheels. Adjustment will
be made by loosening and twisting the tie rods. getting the wheels
straight ahead involves checking the steering wheel angles when
cranked all the way in each direction. Centering the steering wheel is
done by rotating both tie rods the same amount. Finally, crosscheck
the final result by making the toein measurement again.
Specifications
My '66 owners manual says front 40', rear 0.
The owners manual in the Orange book says front 40', rear 0 +/- 10'
The factory manual says front 15' to 20', rear 0'.
Later manuals say front 0. There is general agreement that rear toe
out is not good for stability.
Procedure
| Sports car racers often use Aluminum Plates (do a search for 'Longacre
toe plate') to measure toe-in at the track. The plates are available
commercially for less than $60. The plates are placed against the
wheels on each side of the car. Each plate has a pair of slots cut in
the side for tape measures to be stretched between them. If there is
zero degrees of toein the distance measured at the front of the tire
will be the same as the distance at the rear of the tire.
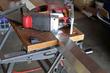
We can emulate that technique at home by cutting some 2 inch aluminum
angle into a pair of 26 inch lengths. We found a 96 inch length of the
material at Home Depot for $15. Plenty of material was left over in
case we made a mistake on cutting or if by mistake we drive over one
of the pieces.
|
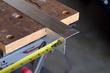
| You will need a pair of measuring tapes. Slots have to be cut into
the ends to capture the end of the tape at one and and to provide a
controlled mark at the other end of the tapes to provide the
measurement.
We made the slots 1/8 in. wide and an inch long and tested to see the
slot was wide enough for the tape.
|
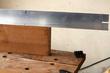
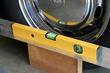
| Next mount each aluminum angle on a board. We used a 2 x 6 x 10. The
mounting does not have to be secure - a single screw will do fine.
|
| Now you can do a trial setup, placing each aluminum angle against a
tire and stretch the tapes between them. Check under the car for
clearance. We had to reduce the height by ripping a piece off the
boards to get free clearance under the car for the tapes.
|
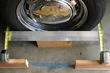
| Here we are set up for a toein measurement on the rear wheels. The
tale of the tapes shows we have too much toein by a half and inch.
The goal is zero degrees or a bit negative. We certainly do not want
toe out or the handling will suffer. Lets make and adjustment to one
side to reduce the toein.
|

| We want to make and adjustment to one side to reduce the toein. But
which side? If we pick the wrong side the car could go down the road
like a crab.
The last time I adjusted the toein, I cranked in toein to some
arbitrary amount on both sides overcoming a natural tendency on my car
towards toe out. We will fix the toe out by relaxing some of this.
One way is to measure the distance from the wheel and the body.
Here I pick an easily made measurement on both sides and will make the
adjustment on the side with the shortest measurement. This is the right
side which is about 1 cm shorter.
|
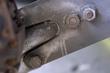
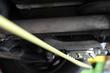
| Changing the toein requires loosening the four bolts holding the end
of the spring plate. In our case we are lengthening the distance from
the front of the car to the wheel. First mark the current position. I
just used a pencil mark on the inside of the banana arm cut out.
|

| Increase the toe out by twisting the adjustment screw on the right.
This is done with a 12 mm Allan wrench. That is part of your tool
kit, right?
Thanks to our mark we can see how much movement has been made. My
target was to eliminate the 1 cm. difference between the two sides.
The inner adjustment will change the camber. When I find and
electronic protract or with 0.1 degree precision, we can check and
adjust camber. Normal pro tractors do not have adequate precision.
After the change, all four screws are retightened.
|
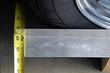
| Tighten everything, put on the wheel. Don't forget to torque the lug
nuts to 94 foot-lbs.
The absolute value of the the measurement is not important. We are
looking for the difference between the two tapes. Maintaining toein
requires the front tape be a shorter distance than the rear tape.
|
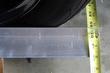
| Our toein measurements are 3/8 in different or there is 3/16 inch of
toein over a distance of 25 inches for each wheel.
From trigonometry:
If the two sides of a triangle are 'a' and 'b' and the hypotenuse is 'h'

tan A = a/h

tan A = (3/16)  / 25

tan A = 0.1875 / 25

tan A = 0.0075

A = 0 degrees 26 min
So. We still have a bit too much toein, need to get it down to 1/8 in. total
|
| Well, I drove the car to work today and see there is a bit more work
to do. The rear wheels are parallel, but are pointing slightly to the
right - the car is crabbing. I could tell because stable steering had
the steering wheel off center to the right.
But we can use one of those cheap laser levels to sight toward the
front of the car. Place the level as shown, check the spot and then
turn the level upside down and check the new spot. The rear tires
actually point toward a point half way between the too spots. This is
because the light does not come straight out the level when it is
oriented as shown. At the front wheels the two spots are about an
inch and a half apart. Yours will be different, but do not assume the
light exits parallel with the level.
Now we can move the level to the other side of the car and check
again. This confirms that adjusting just the passenger side was a bit
optimistic. So, jack up the rear, remove the wheels, cut the
passenger adjustment back and add some adjustment to the drivers side.
Tighten everything again, drive around the block to get the suspension
level and check both the toein and where the wheels are pointing.
Close enough. Test drive on the highway and find stable steering has
the wheel much closer to centered. We are good to go for one more trial.
And then...
After one more tweek, The wheels are pointing straight ahead according
to the laser and the total toein is 1/8 in or about 8 minutes per
side.
|
Last modified: Mon, 20 Jun 2005
Links
|


