|
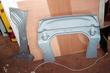
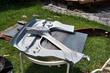
The first step is to get the parts you will be
needing, mainly the suspension pan and the gas tank support (Yes, you
need both!). I purchased mine from Restoration Design. I was very
satisfied with their customer support, but as I learned later my piece
was manufactured incorrectly. The three holes that the a-arm bolts to
were not spaced right, something I learned after welding the pan
in(Doh!). Their explanation was that it happens once in 50 pans or so
and is outsourced to a laser alignment center. I found this to be a
little disturbing, so I urge you to check that your piece is made
correctly beforehand by bolting everything together before welding.
The other issue I had with fit was that the gas tank support piece was
slightly different than mine and had to be slightly modified to fit
correctly. I believe this problem occurs because I have a short wheel
base car and the support may have changed in later years. I would
probably say that most places you buy from will give good results, but
if you can buy locally do so, that way you have someone you can deal
with in person. You must also buy a gas tank seal, this is just some
sticky foam that can be had at Kragen for $5.
|
|
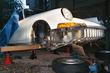
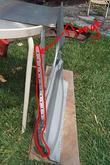
After obtaining the parts, you have to set your car up
for the repair. The difficulty in this is that the front of the car
must be supported behind the front suspension. I used a 4x4 and put
carpeting on top of it and then placing it under the front floor pan
with 4 jack stands underneath the wood, you must have more than two
because other wise the wood will bow. In terms of setting the height,
make sure there is enough room to be able to lie underneath to weld
and grind.
|
|
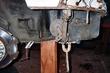
After setting the car up, the next step is to remove
the front bumper and the A-arms. Here is one way to remove the A-arms.
Take off the bolts and support at the front of a-arms. Next unbolt
the two large bolts with cotter pins that attach the A-arm to the
shock absorber through the ball joint. I left the ball joint and
shock dangling from the upper mount the whole time, with brake
attached and all. After the a-arms have been freed of these 5 bolts on
each side it is necessary to remove the torsion bar. The removal is
done by taking the rubber end caps off, and then removing the c-clip
from in front of the bars. To get mine out I had to tap on the bar
from the other end. When the torsion bar is out the a-arms should
just slide off. To remove the bumper there should be three bolts on
an adaptor on each side and then a fourth bolt that attaches near the
outside of the fender wall.
|
|
After the suspension has been removed it is time to
remove the gas tank. First drain the gas tank through the drain plug
at the lower rear end of the tank. Continue by removing all hoses
from the tank, the engine feeder hose on the bottom, the vent hose and
the gas filler hose on the top. Once the tank is drained and all
hoses detached there are three clips that are bolted down with Allen
head screws, one in the front middle and one on each side(if it helps,
the clips were originally painted gray). Once all the clips are
removed, more than likely the gas tank will be fairly stuck. What I
did to remove the tank was to get a 2x4 and place it on a jack
underneath the tank. I had someone else hold down the front of the
car while I jacked up the gas tank. It should eventually pop out.
|
|
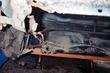
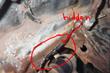
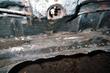
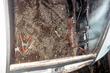
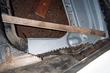
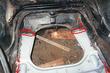
Now that everything attached to the suspension pan has
been removed, the old pan is ready to come out. I found this to be
one of the most difficult parts of the entire project. I would first
recommend looking at your car and trying to fully understand which
pieces of metal have to stay, and which have to be removed. Hold your
new pan up to try and visualize exactly what you will be replacing.
One part I must warn you about is that between the pan and the gas
tank support there is a piece of metal that is hidden and sandwiched.
The best way to describe it is as a continuation of the vertical metal
that runs perpendicular to the pan on each side.
|
|
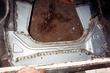
Another important point to remember is to leave one
side of each flange along where the suspension pan goes, because that
is what you are going to weld the new pan to. Once you have the
removal visualized it is time to start cutting. I began by using a
sawzall to get rid of the big areas I knew I wouldn't need, but be
careful!
|
|
Once the large areas of metal were gone I used two
methods to get the rest of the old pan out. Each has it's pros and
cons. The first method I tried was to use a spot weld drill to drill
out each and every spot weld. The problem I encountered was that on
the lower flanges the bit would always catch an edge and break, and
the bits are not cheap.
|
|
The other method I used was to grind away all the
flanges. This was very tedious but ended up working well, just make
sure to only grind away the flange you don't want.
|
|
Be careful because it is easier to remove metal than
it is to put new metal on. So when in doubt on whether something
should be removed, don't do it until you are absolutely positive it is
on one of the two new pieces you are going to weld in. Also make sure
to measure the length of the pan and cut the old one out a little long
so the new one would overlap if installed (Later you can grind it down
more, but for now leave a little extra).
|
|
Before putting the new pan in the car it needs to be
prepared for installation. The first thing I did was spray both
pieces with weld-through primer. Not only does this help in the
welding process but it also provides some extra protection for hidden
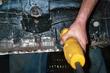
areas you can't paint later. After painting the pans, I had to drill
holes so that the pan can later be plug welded into place.
|
|
There will be three rows of holes on the pan and the
gas tank support will be drilled all along the perimeter. It is a
good idea to look at the placement of the old spot welds before you
start drilling. On the pan you will need to drill holes along the two
flanges then along the front lip of the pan.
|
|
Notice how on your car the front is not perfectly flat
so the holes in the lip must be in clusters of about four, but use
your car as reference for cluster positioning.
For the holes I used a 3/16 in. drill bit and placed the
holes ~1 in. apart. Once you have drilled the pan and the gas tank
support there are several areas to drill on the car itself. The first
is on each side where there is a flange that runs along the center of
the two "legs" of the pan. The other place to drill is along the
bottom edge of the front wall of the car.
|
|
Once the old suspension pan is out and the new one
prepped, the pan must be fit into place. There should be a tight fit,
so it should be difficult to get the new one in by hand. I needed two
people for this part, one person would help support and position the
pan while the other used a wooden block with some type of lever
underneath to push the pan into place.
|
|
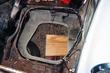
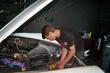
I also needed to use a long piece of wood inside the
luggage compartment to press the front of the pan all the way forward
in the car.
|
|
Once in place I used a combination of c-clamps and
vice grips to hold it in. After it is fit in place I recommend
checking the fit of the suspension, something I neglected to do and
paid for later. When checking fit all you need is the a-arms and the
front mounting plates. Just slide the a-arm in and bolt it to the new
suspension pan. If everything seems to bolt together quickly you
should tack weld the pan into place.
Once the parts are tack welded you can remove all the clamps.
|
|
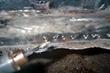
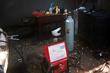
In order to duplicate the factory spot welds as close
as possible with a MIG welder I used a method called plug welding.
The reason for drilling all the holes in the pan was for the plug
welding. In order to use this method you must have a MIG welder with
a gas shield, the flux core will not give you the results you want.
Once you have the welder, the plug welding is fairly simple. I found
the easiest and strongest method was to first use scrap metal to get
the settings right on the machine, you should get a crackling noise as
you weld. After the welder is set, take your welder and put the wire
in the center of a hole you drilled and just hit the button. It
should heat up the piece of metal in back and then the molten metal
will spread out and fill the hole. I found this to be best because if
you start too close to the edge of the circle you drilled the metal
melts away faster and you don't get as good penetration to the piece
of metal in back. Make sure to keep switching sides as you weld so
that you don't get one area too hot.
|
|
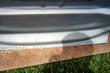
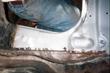
When all of the holes are plugged you will need to do
four main bead welds, here may be more areas you need weld up more.
Two at the rear where the back end of the pan meets the car and two at
the front, right before the pan goes vertical against the front of the
car.
|
|
The final welding step is to put the gas tank support
on and plug weld it into place, remember to grind down any old welds
that will prevent good fit of the gas tank support.
|
|
Just to warn you, don,t depend on my description as a
welding guide, it is not all inclusive and everyone's situation will
be different.
|

|
I was able to do it as a novice welder. I had taken a
class and had guidance from someone with more experience than me. If
you don't feel comfortable welding, than this project or the welding
portion of the project is not for you.
After finishing welding take a 4.5 in. angle grinder and take all your
welds down to be flush with the metal around them. This
will provide a nice finish to the project. My welds did not look
perfect, but my final product looked nice after grinding. After I
finished grinding I put down two coats of por-15 and then covered that
with a coat of standard black paint. On the bottom I sprayed on some
undercoat. I then reinstalled the gas tank, suspension and bumper and
the car was ready to go. I saved myself $1500, but I did put a lot of
time and effort in, I learned a lot and had a great time and isn't
what this is all about anyway?
|


